
分布式FastDfs+nginx缓存高可用集群构建
分布式FastDfs+nginx缓存高可用集群构建
介绍
FastDFS:开源的高性能分布式文件系统;主要功能包括:文件存储,文件同步和文件访问,以及高容量和负载平衡
FastDFS:角色:跟踪服务器(Tracker Server)、存储服务器(Storage Server)和客户端(Client)
- Tracker Server: 跟踪服务器,主要做调度工作,起到均衡的作用;负责管理所有的storage server和group,每个storage在启动后会连接 Tracker,告知自己所属 group 等信息,并保持周期性心跳。多个Tracker之间是对等关系,不存在单点故障
- Storage Server: 存储服务器,主要提供容量和备份服务;以 group 为单位,每个 group 内可以有多台 storage server(高可用),组内的storage server上的数据互为备份
- Client:客户端,上传下载数据的服务器

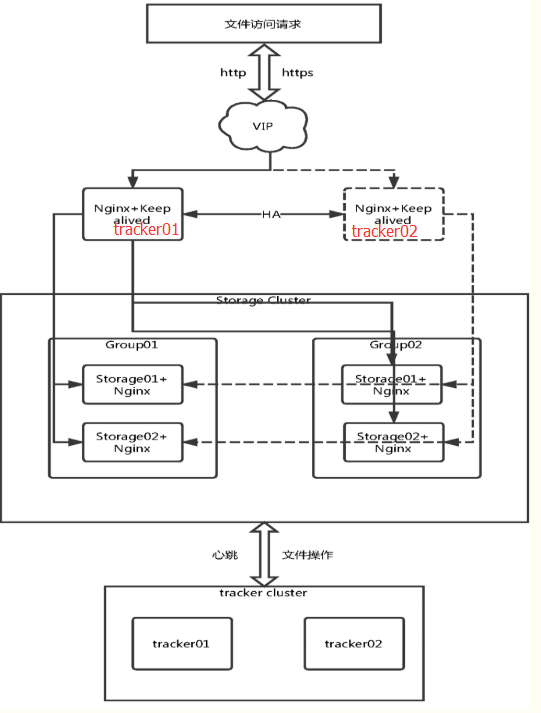
FastDfs+nginx缓存高可用集群环境流程示意图:
实验环境机器说明:
| 机器名称 | IP地址 | 应用 | 说明 |
|---|---|---|---|
| tracker01.csp | 192.168.165.36 | FastDFS,libfastcommon,nginx,keepalived,ngx_cache_purge | CentOS Linux release 7.6.1810 (Core) |
| tracker02.csp | 192.168.165.37 | FastDFS,libfastcommon,nginx,keepalived,ngx_cache_purge | CentOS Linux release 7.6.1810 (Core) |
| storage01.csp | 192.168.165.38 | FastDFS,libfastcommon,nginx,fastdfs-nginx-module | CentOS Linux release 7.6.1810 (Core) |
| storage02.csp | 192.168.165.39 | FastDFS,libfastcommon,nginx,fastdfs-nginx-module | CentOS Linux release 7.6.1810 (Core) |
| storage03.csp | 192.168.165.40 | FastDFS,libfastcommon,nginx,fastdfs-nginx-module | CentOS Linux release 7.6.1810 (Core) |
| storage04.csp | 192.168.165.41 | FastDFS,libfastcommon,nginx,fastdfs-nginx-module | CentOS Linux release 7.6.1810 (Core) |
| VIP | 192.168.165.42 | 无 | 无 |
fastdfs的安装
6台主机同时进行
下载安装包
mkdir -p /usr/local/software
cd /usr/local/software
wget https://github.com/happyfish100/fastdfs/archive/V5.11.tar.gz
wget https://github.com/happyfish100/fastdfs-client-java/archive/master.zip
mv master.zip fastdfs-client-java.zip
wget https://github.com/happyfish100/fastdfs-nginx-module/archive/master.zip
mv master.zip fastdfs-nginx-module.zip
wget https://github.com/happyfish100/libfastcommon/archive/master.zip
mv master.zip libfastcommon.zip
wget http://nginx.org/download/nginx-1.16.0.tar.gz
安装相关依赖
yum -y install make cmake gcc gcc-c++
安装 libfastcommon
unzip libfastcommon.zip -d /usr/local/fast/
cd /usr/local/fast/libfastcommon-master
./make.sh
./make.sh install
ln -s /usr/lib64/libfastcommon.so /usr/local/lib/libfastcommon.so
安装 FastDFS
tar -zxf V5.11.tar.gz -C /usr/local/fast/
cd /usr/local/fast/fastdfs-5.11
./make.sh
./make.sh install
cp -f ./conf/client.conf /etc/fdfs/
tracker安装
在两台tracker上执行
cd /etc/fdfs/
cp tracker.conf.sample tracker.conf
修改tracker配置文件
# egrep -v "^$|^#" tracker.conf
disabled=false
bind_addr=0.0.0.0
port=22122
connect_timeout=30
network_timeout=60
base_path=/fastdfs/tracker
max_connections=256
accept_threads=1
work_threads=4
min_buff_size = 8KB
max_buff_size = 128KB
store_lookup=2
store_group=group2
store_server=0
store_path=0
download_server=0
reserved_storage_space = 10%
log_level=info
run_by_group=
run_by_user=
allow_hosts=*
sync_log_buff_interval = 10
check_active_interval = 120
thread_stack_size = 64KB
storage_ip_changed_auto_adjust = true
storage_sync_file_max_delay = 86400
storage_sync_file_max_time = 300
use_trunk_file = false
slot_min_size = 256
slot_max_size = 16MB
trunk_file_size = 64MB
trunk_create_file_advance = false
trunk_create_file_time_base = 02:00
trunk_create_file_interval = 86400
trunk_create_file_space_threshold = 20G
trunk_init_check_occupying = false
trunk_init_reload_from_binlog = false
trunk_compress_binlog_min_interval = 0
use_storage_id = false
storage_ids_filename = storage_ids.conf
id_type_in_filename = ip
store_slave_file_use_link = false
rotate_error_log = false
error_log_rotate_time=00:00
rotate_error_log_size = 0
log_file_keep_days = 0
use_connection_pool = false
connection_pool_max_idle_time = 3600
http.server_port=8080
http.check_alive_interval=30
http.check_alive_type=tcp
http.check_alive_uri=/status.html
修改的内容为:
bind_addr=0.0.0.0
base_path=/fastdfs/tracker
创建工作目录
mkdir -pv /fastdfs/tracker
启动追踪器
/etc/init.d/fdfs_trackerd start
tail -f /fastdfs/tracker/logs/trackerd.log
开放防火墙端口
# cat /etc/sysconfig/iptables
*filter
:INPUT ACCEPT [0:0]
:FORWARD ACCEPT [0:0]
:OUTPUT ACCEPT [0:0]
-A INPUT -m state --state ESTABLISHED,RELATED -j ACCEPT
-A INPUT -p icmp -j ACCEPT
-A INPUT -i lo -j ACCEPT
-A INPUT -m state --state NEW -m tcp -p tcp --dport 22 -j ACCEPT
-A INPUT -m state --state NEW -m tcp -p tcp --dport 80 -j ACCEPT
-A INPUT -m state --state NEW -m tcp -p tcp --dport 22122 -j ACCEPT
-A INPUT -m state --state NEW -m tcp -p tcp --dport 10050 -j ACCEPT
-A INPUT -j REJECT --reject-with icmp-host-prohibited
-A FORWARD -j REJECT --reject-with icmp-host-prohibited
COMMIT

# systemctl restart iptables.service
storage安装
cd /etc/fdfs/
cp storage.conf.sample storage.conf
修改配置文件
# egrep -v "^$|^#" storage.conf
disabled=false
group_name=group1
bind_addr=
client_bind=true
port=23000
connect_timeout=30
network_timeout=60
heart_beat_interval=30
stat_report_interval=60
base_path=/fastdfs/storage
max_connections=256
buff_size = 256KB
accept_threads=1
work_threads=4
disk_rw_separated = true
disk_reader_threads = 1
disk_writer_threads = 1
sync_wait_msec=50
sync_interval=0
sync_start_time=00:00
sync_end_time=23:59
write_mark_file_freq=500
store_path_count=1
store_path0=/fastdfs/storage
subdir_count_per_path=256
tracker_server=192.168.162.193:22122
tracker_server=192.168.162.194:22122
log_level=info
run_by_group=
run_by_user=
allow_hosts=*
file_distribute_path_mode=0
file_distribute_rotate_count=100
fsync_after_written_bytes=0
sync_log_buff_interval=10
sync_binlog_buff_interval=10
sync_stat_file_interval=300
thread_stack_size=512KB
upload_priority=10
if_alias_prefix=
check_file_duplicate=0
file_signature_method=hash
key_namespace=FastDFS
keep_alive=0
use_access_log = false
rotate_access_log = false
access_log_rotate_time=00:00
rotate_error_log = false
error_log_rotate_time=00:00
rotate_access_log_size = 0
rotate_error_log_size = 0
log_file_keep_days = 0
file_sync_skip_invalid_record=false
use_connection_pool = false
connection_pool_max_idle_time = 3600
http.domain_name=
http.server_port=8888
修改的文件内容为:
group_name=group1 #4台机器分成2组(group1:192.168.165.38,39和group2:192.168.165.40,41)
base_path=/fastdfs/storage #设置 storage 的日志目录
store_path_count=1 #默认就为1,(存储路径个数,需要和 store_path个数匹配)
store_path0=/fastdfs/storage #设置存储路径
tracker_server=192.168.162.193:22122
tracker_server=192.168.162.194:22122#tracker 服务的IP和端口,多个就添加多条记录
http.server_port=8888 #设置http端口号
创建目录
mkdir -pv /fastdfs/storage
启动 storage:
/etc/init.d/fdfs_storaged start
tail -f /fastdfs/storage/logs/storaged.log
查看集群状态:
在任意一台storage主机即可
/usr/bin/fdfs_monitor /etc/fdfs/storage.conf
开放防火墙端口
cat /etc/sysconfig/iptables
*filter
:INPUT ACCEPT [0:0]
:FORWARD ACCEPT [0:0]
:OUTPUT ACCEPT [0:0]
-A INPUT -m state --state ESTABLISHED,RELATED -j ACCEPT
-A INPUT -p icmp -j ACCEPT
-A INPUT -i lo -j ACCEPT
-A INPUT -m state --state NEW -m tcp -p tcp --dport 22 -j ACCEPT
-A INPUT -m state --state NEW -m tcp -p tcp --dport 8888 -j ACCEPT
-A INPUT -m state --state NEW -m tcp -p tcp --dport 23000 -j ACCEPT
-A INPUT -m state --state NEW -m tcp -p tcp --dport 10050 -j ACCEPT
-A INPUT -j REJECT --reject-with icmp-host-prohibited
-A FORWARD -j REJECT --reject-with icmp-host-prohibited
COMMIT

# systemctl restart iptables.service
客户端测试
tracker台中可以随意找一台做客户端测试下:
# egrep -v "^$|^#" client.conf
connect_timeout=30
network_timeout=60
base_path=/fastdfs/tracker
tracker_server=192.168.165.36:22122
tracker_server=192.168.165.37:22122
log_level=info
use_connection_pool = false
connection_pool_max_idle_time = 3600
load_fdfs_parameters_from_tracker=false
use_storage_id = false
storage_ids_filename = storage_ids.conf
http.tracker_server_port=8888
修改文件的内容为:
base_path=/fastdfs/tracker #tracker服务器文件路径
tracker_server=192.168.165.36:22122
tracker_server=192.168.165.37:22122
http.tracker_server_port=8888 # tracker 服务器的 http端口号,必须和tracker的设置对应起来
上传一张图片到服务器上
/usr/bin/fdfs_upload_file /etc/fdfs/client.conf /home/111/1.jpg
配置FastDFS集群支持http
支持http请求,安装nginx(4个storage节点安装nginx,首先安装fastdfs-nginx-module,fastdfs与nginx集成模块)
cd /usr/local/software/
unzip fastdfs-nginx-module.zip -d /usr/local/fast/
cd /usr/local/fast/fastdfs-nginx-module-master/src
yum -y install pcre pcre-devel
yum -y install zlib zlib-devel
yum -y install openssl openssl-devel
cd /usr/local/software
tar -zxf nginx-1.9.9.tar.gz -C /usr/local/
cd /usr/local/nginx-1.9.9
修改config编译文件
# vim /usr/local/fast/fastdfs-nginx-module-master/src/config
ngx_addon_name=ngx_http_fastdfs_module

if test -n "${ngx_module_link}"; then
    ngx_module_type=HTTP
    ngx_module_name=$ngx_addon_name
    ngx_module_incs="/usr/include/fastdfs /usr/include/fastcommon"
    ngx_module_libs="-lfastcommon -lfdfsclient"
    ngx_module_srcs="$ngx_addon_dir/ngx_http_fastdfs_module.c"
    ngx_module_deps=
    CFLAGS="$CFLAGS -D_FILE_OFFSET_BITS=64 -DFDFS_OUTPUT_CHUNK_SIZE='256*1024' -DFDFS_MOD_CONF_FILENAME='\"/etc/fdfs/mod_fastdfs.conf\"'"
    . auto/module
else
    HTTP_MODULES="$HTTP_MODULES ngx_http_fastdfs_module"
    NGX_ADDON_SRCS="$NGX_ADDON_SRCS $ngx_addon_dir/ngx_http_fastdfs_module.c"
    CORE_INCS="$CORE_INCS /usr/include/fastdfs /usr/include/fastcommon"
    CORE_LIBS="$CORE_LIBS -lfastcommon -lfdfsclient"
    CFLAGS="$CFLAGS -D_FILE_OFFSET_BITS=64 -DFDFS_OUTPUT_CHUNK_SIZE='256*1024' -DFDFS_MOD_CONF_FILENAME='\"/etc/fdfs/mod_fastdfs.conf\"'"
fi
编译安装
./configure --add-module=/usr/local/fast/fastdfs-nginx-module-master/src/
make -j 4
make install
cd /usr/local/fast/fastdfs-nginx-module-master/src/
cp mod_fastdfs.conf /etc/fdfs/
修改mod_fastdfs.conf配置文件
# egrep -v "^$|^#" /etc/fdfs/mod_fastdfs.conf
connect_timeout=20
network_timeout=30
base_path=/tmp
load_fdfs_parameters_from_tracker=true
storage_sync_file_max_delay = 86400
use_storage_id = false
storage_ids_filename = storage_ids.conf
tracker_server=192.168.165.36:22122
tracker_server=192.168.165.37:22122
storage_server_port=23000
group_name=group1
url_have_group_name = true
store_path_count=1
store_path0=/fastdfs/storage
log_level=info
log_filename=
response_mode=proxy
if_alias_prefix=
flv_support = true
flv_extension = flv
group_count = 2
[group1]
group_name=group1
storage_server_port=23000
store_path_count=1
store_path0=/fastdfs/storage
[group2]
group_name=group3
storage_server_port=23000
store_path_count=1
store_path0=/fastdfs/storage
注意:group1:192.168.165.38,39和group2:192.168.165.40,41
复制FastDFS(fastdfs-5.11)里的2个文件到/etc/fdfs/目录下
cd /usr/local/fast/fastdfs-5.11/conf/
cp http.conf mime.types /etc/fdfs/
创建一个软链接,在/fastdfs/storage 文件存储目录下创建软链接,将其链接到实际存放数据的目录
ln -s /fastdfs/storage/data/ /fastdfs/storage/data/M00
修改nginx配置文件为:
cat /usr/local/nginx/conf/nginx.conf

#user  nobody;
worker_processes  4;
worker_cpu_affinity auto;
worker_rlimit_nofile 65535;

#error_log  logs/error.log;
#error_log  logs/error.log  notice;
#error_log  logs/error.log  info;

#pid        logs/nginx.pid;


events {
    worker_connections  65535;
}


http {
    include       mime.types;
    default_type  application/octet-stream;

    #log_format  main  '$remote_addr - $remote_user [$time_local] "$request" '
    #                  '$status $body_bytes_sent "$http_referer" '
    #                  '"$http_user_agent" "$http_x_forwarded_for"';

    #access_log  logs/access.log  main;

    sendfile        on;
    #tcp_nopush     on;

    #keepalive_timeout  0;
    keepalive_timeout  65;

    #gzip  on;

    server {
        listen       8888;
        server_name  localhost;

        #charset koi8-r;

        #access_log  logs/host.access.log  main;

        #location / {
        #    root   html;
        #    index  index.html index.htm;
        #}
        location ~ /group([0-9])/M00 {
            ngx_fastdfs_module;
        }

        #error_page  404              /404.html;

        # redirect server error pages to the static page /50x.html
        #
        error_page   500 502 503 504  /50x.html;
        location = /50x.html {
            root   html;
        }
}
启动nginx
/usr/local/nginx/sbin/nginx
上传图片,然后访问测试
tracker server 上安装 nginx缓存
tar -zxf ngx_cache_purge-2.3.tar.gz -C /usr/local/fast/
yum -y install pcre pcre-devel
yum -y install zlib zlib-devel
yum -y install openssl openssl-devel
cd /usr/local/software
tar -xvf nginx-1.16.0.tar.gz -C /usr/local/
cd /usr/local/nginx-1.16.0/
./configure --add-module=/usr/local/fast/ngx_cache_purge-2.3
make -j 4
make install
创建缓存目录
mkdir -pv /fastdfs/cache/nginx/proxy_cache
修改nginx配置文件:
# cat /usr/local/nginx/conf/nginx.conf

#user  nobody;
worker_processes  4;
worker_cpu_affinity auto;
worker_rlimit_nofile 65535;

#error_log  logs/error.log;
#error_log  logs/error.log  notice;
#error_log  logs/error.log  info;

#pid        logs/nginx.pid;


events {
    worker_connections  65535;
}


http {
    include       mime.types;
    default_type  application/octet-stream;

    #log_format  main  '$remote_addr - $remote_user [$time_local] "$request" '
    #                  '$status $body_bytes_sent "$http_referer" '
    #                  '"$http_user_agent" "$http_x_forwarded_for"';

    #access_log  logs/access.log  main;

    sendfile        on;
    #tcp_nopush     on;

    #keepalive_timeout  0;
    keepalive_timeout  65;

    #gzip  on;
    server_tokens off;
    gzip on;
    gzip_disable "MSIE [1-6]\.";
    gzip_min_length 1100;
    gzip_buffers 4 8k;
    gzip_comp_level 3;
    gzip_proxied any;
    gzip_types text/plain text/css application/x-javascript text/xml application/xml application/xml+rss text/javascript application/json image/jpeg image/gif image/png image/jpg;

    large_client_header_buffers 4 8k;
    client_header_buffer_size 8k;
    tcp_nopush on;
    tcp_nodelay on;
    server_names_hash_bucket_size 128;
    client_max_body_size 300m;
    client_body_buffer_size 128k;

    proxy_redirect off;
    proxy_set_header Host $http_host;
    proxy_set_header X-Real-IP $remote_addr;
    proxy_set_header X-Forwarded-For $proxy_add_x_forwarded_for;
    proxy_connect_timeout 90;
    proxy_send_timeout 90;
    proxy_read_timeout 90;
    proxy_buffer_size 16k;
    proxy_buffers 4 64k;
    proxy_busy_buffers_size 128k;
    proxy_temp_file_write_size 128k;
    proxy_cache_path /fastdfs/cache/nginx/proxy_cache levels=1:2 keys_zone=http-cache:200m max_size=1g inactive=30d;
    proxy_temp_path /fastdfs/cache/nginx/proxy_cache/tmp;

    upstream fdfs {
        server 192.168.165.38:8888 weight=1 max_fails=3 fail_timeout=30s;
        server 192.168.165.39:8888 weight=1 max_fails=3 fail_timeout=30s;
        server 192.168.165.40:8888 weight=1 max_fails=3 fail_timeout=30s;
        server 192.168.165.41:8888 weight=1 max_fails=3 fail_timeout=30s;
    }


    server {
        listen       80;
        server_name  localhost;

        #charset koi8-r;

        #access_log  logs/host.access.log  main;

        location / {
            root   html;
            index  index.html index.htm;
        }

        location ~/group([0-9])/M00 {
            proxy_next_upstream http_502 http_504 error timeout invalid_header;
            proxy_cache http-cache;
            proxy_cache_valid 200 304 12h;
            proxy_cache_key $uri$is_args$args;
            proxy_pass http://fdfs;
            expires 30d;
        }

        #error_page  404              /404.html;

        # redirect server error pages to the static page /50x.html
        #
        error_page   500 502 503 504  /50x.html;
        location = /50x.html {
            root   html;
        }
}
启动nginx
/usr/local/nginx/sbin/nginx
上传图片,访问测试
keepalived安装
yum -y install keepalived
修改配置文件
# cat /etc/keepalived/keepalived.conf
! Configuration File for keepalived

global_defs {
    router_id LVS_DEVEL
}

vrrp_script chk_nginx {
    script "/etc/keepalived/chk_nginx.sh"
    interval 6
    weight -2
}

vrrp_instance VI_1 {
    state MASTER
    interface eth0
    virtual_router_id 51
    priority 100
    advert_int 1
    authentication {
        auth_type PASS
        auth_pass 1111
    }
    virtual_ipaddress {
        192.168.165.42/24
    }
    track_script {
        chk_nginx
    }
}
准备:另一台的state改为BACKUP,priority改为小于100的值
配置健康检查脚本:
# cat /etc/keepalived/chk_nginx.sh
#!/bin/bash
#
# check nginx status

A=$(ps -C nginx --no-header |wc -l)
if [[ ${A} -eq 0 ]];then
  /usr/local/nginx/sbin/nginx
  sleep 3
  if [ $(ps -C nginx --no-header |wc -l) -eq 0 ];then
    local message="$(date) ':nginx is not healthy, try to killall keepalived'"
    echo ${message} >> /etc/keepalived/keepalived.log
    systemctl stop keepalived.service
  fi
fi
赋予执行权限:
chomd +x /etc/keepalived/chk_nginx.sh
添加防火墙规则
# cat /etc/sysconfig/iptables
*filter
:INPUT ACCEPT [0:0]
:FORWARD ACCEPT [0:0]
:OUTPUT ACCEPT [0:0]
-A INPUT -m state --state ESTABLISHED,RELATED -j ACCEPT
-A INPUT -p icmp -j ACCEPT
-A INPUT -p vrrp -j ACCEPT
-A INPUT -i lo -j ACCEPT
-A INPUT -m state --state NEW -m tcp -p tcp --dport 22 -j ACCEPT
-A INPUT -m state --state NEW -m tcp -p tcp --dport 80 -j ACCEPT
-A INPUT -m state --state NEW -m tcp -p tcp --dport 22122 -j ACCEPT
-A INPUT -m state --state NEW -m tcp -p tcp --dport 10050 -j ACCEPT
-A INPUT -j REJECT --reject-with icmp-host-prohibited
-A FORWARD -j REJECT --reject-with icmp-host-prohibited
COMMIT

#  systemctl restart iptables.service
启动服务
systemctl start keepalived
用vip访问测试
参考链接:
https://www.cnblogs.com/NGames/archive/2019/06/23/11065282.html